Five Gyres and More


 I saw this photo of kayakers on facebook and the thing that popped into my head unbidden was, Plastic Gyre.  Of course this isnt a plastic gyre, the real plasic gyres are in the worlds oceans and there are five of them and they are huge, and while there may be some plastic kayaks or kayak parts in these gyres, the majority of the plastic is from other sources.  So whenever kayakers decry plastic pollution, I see some irony in their stance.
 
I posted this picture before under the heading, how many kayaks are there? and this massive assembly of kayaks really does come close to being a genuine plastic gyre. And before you accuse me of being holier than thou with my wood frame skin on frame kayaks, I confess that yes,  there are plastic resins used in its construction, mostly in the skin and the lashings and the coatings used to seal the skin.  And I also wear some plastic garments when paddling and the small fibers that theyre composed of break off during washing and end up in the ocean where they displace plankton in the bodies of animals that eat plankton.
Lets let the issue of whether I am a hypocrite or not rest for a moment and look at the obvious problem of plastic pollution in the worlds oceans.  The organization Five Gyres has devoted itself to the problem. Click on THIS LINK to find out more about them.
Policy director Stiv Wilson of Five Gyres explains in an ARTICLE that plastic pollution on the worlds beaches is not the main problem but could be a big part of the solution. While the five gyres collect plastic that has made it into the oceans, they also spit out a certain percentage of plastic each year.  Some of the plastic moves on to different gyres, but some of it also gets spit out and ends up on beaches.
If we were to stop making plastics tomorrow, and did annual beach cleanups, plastic would be gone from the worlds oceans in a matter of decades.
The problem with the plastic in the oceans is not that the plastic ends up on our beaches and assaults our esthetics but rather that when in the ocean it harms the animals that live there. Inundating the world in plastic products and then expecting none of them to end up in the oceans is not realistic.  Maybe stopping the production of plastic is not realistic either but it sure would fix the problem.  What we have to decide is whether not having plastics in our lives is a bigger inconvenience than having it in our oceans. Weve lived without plastics before and we can do it again.
Read More..

Paddle Dynamics

Three Greenland style paddles on display at the boat ramp where I just got done testing them. The breakdown paddle on the left had the tips thinned. The one in the middle had the varnish touched up. Note that the paddle in the middle has a more curved face than the one on the left which has a flatter, thinner face. The one on the right, the long one, is one I just finished carving.
I recently did some maintenance on two paddles for a client of mine.  One of the paddles was just worn and needed a little sanding and a coat or three of fresh varnish.  The other one was making noises in use because the tips were too blunt so I made the tips sharper.  Before returning the paddles, I took them out to test because that is the right thing to do when you make a repair and charge someone for it.
Oh yes, there was also a third paddle, one that was supposed to be a blank for a paddle making class that a prospective students wife had given him as a Christmas present.  Three years or more passed and the student still hadnt managed to arrange a class date to finish the paddle, so I finished it just get the thing out of my shop.  And so while I was testing the other two paddles, I thought I would test this one as well.
Things got off to a slow start.  The boat I used for a test vehicle belonged to someone else and had very slack deck lines that made it hard to keep spare paddles on deck but after some experimentation, I managed to figure out a way to carry the spare paddles while testing.
Paddle testing for me is usually comparative.  Given my testing tools which consist of myself as motor and test evaluator, a gps as speed indicator, a kayak and some suitable body of water to float the boat and offer resistance to forward progress, the tests tend to be subjective and relative.  That is, I dont have absolute numbers at the end of the test.  I take several paddles, paddle back and forth and compare the performance of the paddles under more or less identical conditions.  The two things I can measure are speed and the amount of effort I put into paddling.  Effort is hard to measure so it usually means that I try to make the boat go as fast as I can with a given paddle.  And when I am going as fast as I can, I measure the speed with the GPS.
Usually what happens is that one paddle feels better than another or one paddle gives me a higher top speed than another.  And in general, results tend to be vague impressions more than anything rigidly scientific.  But some good can come out of even an unscientific test, as happened in this case.
Let me share my observations.
As expected with the three paddles pictured above, the long paddle gave me the best top speed. This paddle was 98 inches long.  The two shorter paddles were both 84 inches long.  Normally I like a paddle that is somewhere between 88 and 92 inches long so I expected the 84 inch paddles to be slightly underpowered.  As it turned out, they produced top speeds not that much slower than the long paddle.  Acceleration with the short paddles was lower than with the long paddle, but by and large, once I got the boat going, the short paddles did pretty well.
What was happening was that the hull speed of the boat was the limiting factor in the test and not the paddles.  That is,  the short paddles were adequate for getting the boat up to hull speed but couldnt push the boat much beyond that.  And thats probably adequate for most situations.  The long paddle with its greater blade surface could push the boat beyond its hull speed but at the expense of greater effort.
So the problem with testing paddles using a GPS and a slow boat is that just about any paddle can push the boat up to hull speed and further effort even with a larger paddle produces little extra speed so that measurement of top speed are more an indication of the boats limitations than any measure of the paddles effectiveness.
It would be nice to have a meter that could measure the speed of the boat, the resistance offered by the boat and the power needed by the paddler to keep the boat at that speed.  If such a thing were available, it would be able to offer a good comparative test of different paddles effectiveness.  Even if two paddles were able to bring a given boat up to the same speed, the one that requires less effort by the paddler would be the better paddle.  However, since there is no good way to measure that effort, it is hard to make meaningful claims about the effectiveness of one paddle vs. another and the question of which of two paddles is the better one remains largely subjective.
Read More..

Starboard Fiberglassing Finished

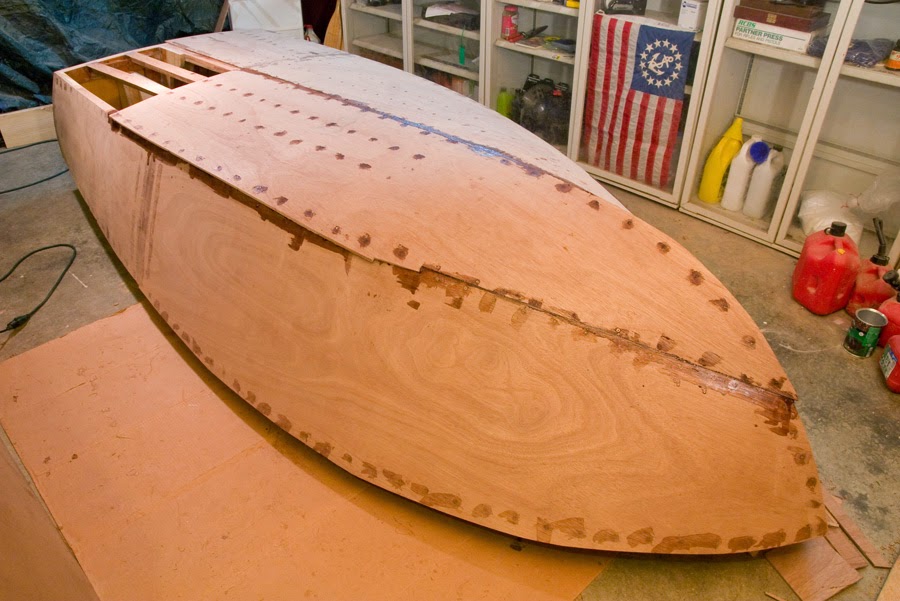
It has been a while since Ive worked on the boat. However, Im back at it, and just finished fiberglassing the starboard side a few days ago. Here are a few photos...


6oz fiberglass cloth taped into place. I hadnt noticed the cloth had shifted before I cut it at the bow.

I left enough extraneous area to make it easy to cut  the cloth after the side was soaked with epoxy.
Ive found that its much easier to remove the tape by pulling it AWAY from the fiberglass cloths frayed edge than toward it. MUCH less hassle.
Cloth wetted out with epoxy resin & trimmed along the bottom.
Because I hadnt noticed that the cloth shifted earlier, I cut away too much around the bow, and did not have enough cloth to lap over onto the port side.

I mis-judged and mixed WAY too much epoxy, so I went ahead and fiberglassed part of the port side using the scrap cloth cut from the bow area.
I have also cut and assembled the transom knee for the Zip. I dont have photos at the moment, so more on that later....


Read More..

New plywood more chine fixes

With G7 over, it was time to get back to work on the boat. 

In early October, I placed my order for 5 sheets of 1/4” BS 1088 Meranti Hydtrotek with Homestead Hardwoods in Ohio. I received my well-packaged crate of plywood just a few days later. Right off, I was more impressed with the Hydrotek than the Douglas Fir marine plywood I’d been using up to this point. The Meranti has a more attractive appearance, and a much smoother surface. It is also a 5-ply structure, rather than 3-ply like the Fir, so the outer and center plies are considerably thinner. I’m looking forward to using it to plank the boat, although I’ve read that Meranti splinters considerably when it is cut... we’ll see.


My crate of Meranti Hydrotek, fresh off the truck.
 
BS 1088 Meranti Hydrotek
Before I can plank the boat, though, I still have to finish fairing the framework. That means I have to deal with another problem along the chines.

Originally, I had cut 1” deep notches in the frames to receive the chine logs. However, the “1-inch” board I bought for the chines was in reality only 3/4” thick. This turned out to not be a problem, everywhere except frame #1. At frame #1, the chines ended up being recessed too deeply into the frame notches, leaving 1/4” of the frame extending past the chines on the sides of the boat.

1/4" of frame #1 extends past chine log.

1/4" of frame #1 extends past chine log.

Originally, my plan was to simply fair the frames inward to meet the chines. I changed my mind, however, and decided to laminate on a little extra material to this section of the chines, much like I did up forward. 

I cut two strips of 1-3/4” x 4’ Southern Yellow Pine from the most vertical-grained board I could find at Lowes. I planed these by hand down to roughly 3/8” thickness, and attached them with thickened epoxy , centering them with the 2’ mark in the middle of the frame. The next step is to fair these strips down to shape so that they form a fair curve along the length of the chine. Hopefully I can begin to plank the boat not long after that.


Dry fitting the 1-3/4" x 4 strips into place.
The port side strip clamped on while the epoxy cures.

Next step is to fair it down.


Read More..

Pleasant Bay and a simple rig adjustment

Last week I returned to my old stomping grounds off Harwichport / Chatham to see how the boat would strut her stuff in a little breeze.  I was able to sail out to the whistle, bell, and back in no time as well as do the three harbor cruise.

Issues with the way I rigged the boat crop up gradually as the wind increases.
1.  There was no way to cleat the mainsheet in without using two hands as I had failed to put a fairlead in just ahead of the clam cleats, leading to a poor lead to the cleat and too much work on the part of the skipper.  Easily solved with trading out the fairleads from the rudder head for the uphaul, and the one I put on the sprit.

2.  The mizzen sheet kept getting hung up on the motor, necessitating the use of a paddle to keep pushing it off the motor cowl.  I added a ring on a bungee cord to the sprit and ran the sheet up through it.  As the sheet tries to move outboard, the shock cord tensions and brings it inboard, thus avoiding the motor!  When the sheet is tensioned, the ring moves out to allow for trim.


12 miles under the keel in a nice breeze.  Looking forward to the next sail.  

September 8th - 
Great sail in Pleasant Bay today with another retired educator.  We sailed out of Areys Pond (small fee for the ramp, but they put it in and retrieve it!).  Owner, Tony Davis, and his crew run one of the best sailboat yards on Cape Cod.  They specialize in Cape Cod Catboats, and have a special place on Areys Pond.  It is a first class establishment.  

Throughout the day, we sailed through some very skinny water only grounding out a couple of times.  Lifting the board and backing the main allowed us to carry on.  

The ring on the shock cord worked wonderfully!  No hang ups on any of the stern fittings or motor.  No stress sailing.  I do need to change the clam cleats for the main to cam cleats for a more positive grip on the mainsheet.  Next project!  

We sailed upwind for about 2 hours, measuring 9 miles of tacking, and got as far as the entrance to Ryders Cove in Chatham before heading home.  ON the way back, we took some great shortcuts that can only be done in a boat that draws 7".  We sailed full blast of the eel grass, sand bars, and clam flats making short work of the trip home (40 minutes).  After derigging, headed home.  At times we had little wind, other times, gusts to 18kts.  I cant say enough about this boat.  Wish we had some pictures under way, but were too busy gabbing, eating, and just enjoying the day.  


Read More..

4th of July in the boat shop

It was a busy 4th of July weekend in my cramped little boat shop. I set out my U.S. Yacht Ensign flag, and got right to work.

After a week of shaping that mahogany shim on the port chine, I finally got it to a point I was satisfied with. So, without any more delays, I epoxied on the forward bottom planking.


The shim on the port chine

Glen-L Utility hull planking
3/4 of the bottom planking is now attached.
This time around, I used System Three Silvertip epoxy, thickened with the remainder of my collected mahogany sawdust. I learned a valuable lesson about using thickened epoxy versus Gel Magic.

Although I used the remainder of my mahogany sawdust, the mixture was still not as viscous as Gel Magic. However, it sure seemed thick enough to do the job. In the end, I used perhaps 2/3 as much epoxy for the port side as Id used of GelMagic when I did the starboard. Not only that, but it was easier and faster to apply. This saved me time, stress, and money.... some pretty good selling points. 

I still had plenty... PLENTY... of squeeze-out to fill the gaps I was concerned about, too.

I also used 4” spacing on the screws for this side, compared to the 3” spacing I used on the starboard side. The planking contact seemed just as good, and I used 3/4 as many screws (73 this time, compared to 97 before). Again, this saved me time, stress and money.

And yes, this time I did remember to scrape away excess epoxy from the areas where I’ll need to fit the butt blocks.
Read More..

Paint

I have decided to paint the exterior as the hull is upside down and ready at this point.  Centerboard will get painted as well.

The paint du jour is System III waterbased linear polyurethane.  The plan is to give the hull 2-3 coats of primer then lightly sand til smooth and then attempt a roll and brush tip approach with the top coat.  This paint will clean up with soap and water and has very low VOC for use in close areas without ventilation.  This is important in that I cannot control the environment in my small garage and need something safe.  The downside is that it does not go on well in hot weather, therefore the timing of doing this in October in New England should be good.  Although falling leaves and neighbors with leaf blowers can ruin a finish in the blink of an eye.

The whole boat has been sanded to 180 grit and dusted and wiped clean of dust with rags and solvent.  I will do it one more time prior to the application of the paint.  Photos coming.

10-2-14
Two coats of primer were applied today.  Amazing how it looks better already.  The LPU goes on very thin and needs tipping with a polyester brush.  One needs to work pretty quickly.  It takes a couple of hours for one coat to dry sufficiently to do another coat on top.  I did make the mistake of going back over the transom as I thought it was too thin, leaving an orange peel effect.  Fixable with more sanding...


Looks like it will be three coats of primer prior to top coat.  Sanding with 180 grit prior to the final coat.


A quick word on the waterbased LPU.  It rolls on easily, washes off with water, and has little VOCs.  This makes it a good paint for the homebuilder working in less than ideal conditions (some moth has taken up permanent residence in the centerboard).

10-3-14
Forgot to put the centerboard in the garage last night before going to work.  It rained...
Just read this on the materials sheet.
"The film will not be water-resistant until it is cured. Rain or moisture
from dew or condensation can damage the film. The primer cures as a
relatively rigid film, so is not recommended for use on flexible substrates
like fabric or thermoplastic"   Oh dear.  looks like more sanding.  Again.

Postmortum - It actually had just a little dribble that was easily sanded out.  This aspect of the project is going well.  Helps to read the directions.

Did a little further shaping of the rudder today and prepped the headstock for paint since that is what we are doing right now.  Does not look as if a third coat of primer will be necessary, but I will take the boat out in light tomorrow to sand and double check.

10-4-14
hand sanded with 150 grit this morning for two hours then applied a coat of top coat.  the LPU paint is best applied with a sprayer, but I have none, so went with roller and brush.  The result is not as smooth as I had hoped.  will sand again between coats in an attempt to control the finish product.  It can be thinned with a little water and will try that next time as I think the lack of humidity today caused the paint to set up way too fast.

October 6, 2014
put on another two coats this morning and afternoon dodging the rain.  The online builders forum suggested painting on a rainy day with the garage door open.  Yup,  much better results.  Then an old buddy of mine suggested that I go to 4 coats and wet sand / buff for a final mirror finish.  Yup.  Thats the plan.  Well see if I have enough paint on.


Fourth coat applied. 


The light spot is the reflection from behind!  This is working.

Hope to get a photo outdoors tomorrow.


Here is a photo after 4 coats taken in good light.


The resulting finish looks ok from 5 feet away, but there are a lot of brush marks that are moderately deep.  I have attempted to buff these out using the long board, 400, 600, 800, 1000, 1500, 1800 grits successively. Then, following up with rubbing compound and polish.  The result is mixed as I have a lot of halos showing.


Aft starboard panel has been wet sanded from 400 through 1500 then buffed with rubbing compound and polish.  It is a very slick surface that is highly reflective.  Many surface swirls however.  


Hmm.  looks better now after sanding down the brush marks and polishing polishing polishing.  I did wear through one spot that will need touch up, and some scratches got into the coat from some dirt that got under then sandpaper.  Ouch.  Not visible when the boat is on the trailer, but I know its there! Will touch up today.


Found out that I was in possession of a buffer/polisher in that the 7" angled grinder was actually a 6" sander/polisher according to the label on it!  Will get a better pad and backing plate and try this in the spring.  Boat is now upright and ready to finish as much of the interior prior to the weather closing in.
Does not look too bad from this far away.  Needs polishing and buffing.
Summary:
If using waterbased LPU applied with Roller/brush
1.  4 coats primer
2. Wet sand with 400 to smooth finish
3.  apply 3 coats top coat
4.  Buff til smooth and scratch free.

that sums it up and will save someone a ton of time.


Read More..